©By: John T. Blair (WA4OHZ) 1133 Chatmoss Dr., Va. Beach, Va. 23464; (757) 495-8229
Originally written: circa 1989
In part 1, I covered most of the basic hand tools. Now lets move on to some more specialized tools that will come in very handy for troubleshooting and diagnosing problems. These are usually be purchased as needed.
|
||
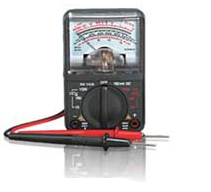 Analog Multimeter |
First in my book is an analogue multimeter. The digital ones are OK but I prefer the old
fashioned ones with the real meter movement. Probably the best source for one of these is either
Amazon.com or Ebay.com. A good meter can be purchased for about $30 on sale. This meters will
allow you to measure voltage (AC or DC), current, and resistance. (Note: some of the digital
meters will also let you measure capacitors, temperature and frequency.) This tool is a must for
trouble shooting any electrical problem.
|
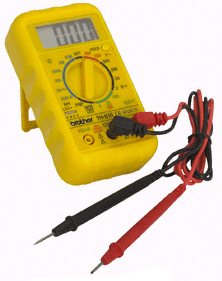 Digital Multimeter |
|
I know most mechanics just use the Test light (little screwdriver looking thing with a
light bulb in it, but that just doesn't cut it for me although it is better than nothing). It
basically just lets you know if there is voltage or not, a go, no go, tool.
|
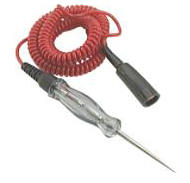 Test Light |
|
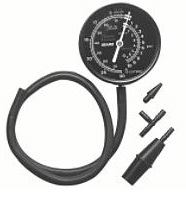 Vacuum gauge |
A vacuum gauge is used to measure the vacuum in the car's engine and they are
great diagnostic tools. Many old timers use them for
setting carbs and timing. Like a compression gauge, the vacuum gauge lets you get a feel for what
is happening in the engine, like sticking valves, ignition and valve timing, or if any of the valves
are burned, and more. Many of the newer cars have either electrical or vacuum motors to control
things like the ducting for your heater, etc. The vacuum gauge can test to see if you have vacuum
getting to these items and can also be used for checking fuel pressure on low pressure (non-fuel
injected systems).
|
|
|
Another vacuum related tool is the MityVAC or Vacuum Pump Kit. In addition to having a vacuum
gauge, it has a trigger grip to allow you to create a vacuum for testing all kinds of diaphragms,
etc. as well as read vacuum and you can see how long a part holds a vacuum. They cost from about
$25 to about $70 depending on what accessories you get with in. Many come with a great book on how
to use on in troubleshooting engine problems. The newer cars have the more vacuum operated controls
like those used in the heating system.
|
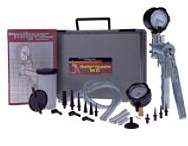 MityVac or Vacuum pump |
|
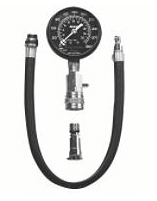 Compression Gauge |
A compression gauge is used to check how much pressure can be created in a
cylinder.
A compression test, along with a vacuum gauge, is
about the only way of telling if an engine has a blown head gasket, bad valves, or rings without
removing the head. If you buy one, get the one that has a long flex hose and actually screws
into the spark plug holes.
|
|
| For tuning up older cars with points, (pre 1980 - Before Computers), you will need a timing light and a dwell/tach meter. These meters allow you to tell what the engine revohttps://auto.howstuffworks.com/car.htmlutions per minute (RPM) are so you can adjust the carburetor, and help you set the ignition points. | 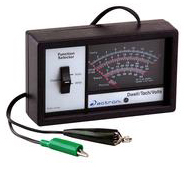 Dwell Tach Meter |
|
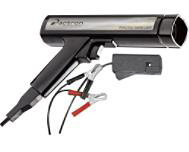 Timing Light |
For setting the timing on earlier cars with distributors, where the spark plug fires in
relation to Top Dead Center (TDC), you'll need a Timing Light. I prefer the DC
powered timing light (about $50 to $100). This type of timing light uses the car's battery
for power and clips onto #1 spark to pick up when #1 spark plug fires. This triggers its
high intensity light which can be seen even on a sunny day. The dwell meter is used to set
the points and the tachometer is used to set the engines idle speed.
|
|
| For a lot of adjustments or trying to diagnose a no start problem a remote starter switch is a great tool. Simply clip it between a 12V source and the the "start" pin (low current) side of the starter solenoid. Then when you press the trigger it will apply power to the starter solenoid which will apply power to the starter. This allows you to pump the engine to turn over just a few degrees or actually try and start the enging. | 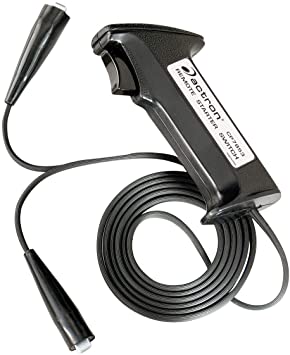 Remote Starter Switch |
|
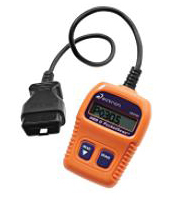 Actron Pocket Scan abc ODBII reader |
For newer cars, post 1980, you will need to be able to interface to the onboard computer.
The computers stores information about how the various sensors are working. When something
isn't working correctly, the computer sets a code, and turns on the Check Engine Light
(CEL) or Maintenance Required Light (MIL). From 1980 thru 1995 car manufacturers
used a system called "On Board Diagnostics I" (ODB I). Manufactures were pretty much
able to do as they please. For example, GM products required jumpiring 2 pins on a connector
under the dash, turn the ignition key to the "run" position and the codes would blink
out on the CEL.
Chrysler was user friendly, you turned the ignition key from "off" to "run", than back off, and repeated this 3 times. The 3rd time, you leave the key in the run position and the codes would blink out on the CEL.
|
|
|
Other manufactures required external equipment. Ford required a special tool for this (usually
about $35) that exercised the various servos and check the sensors, then it displayed the codes
by blinking them out on a light on the tool. Volvo and others didn't provide any way for a
layperson to get the codes on some of their cars.
|
||
|
In 1996 manufactures went to "On Board Diagnostics II" (ODB II). This set a better standard on the interface connector, and the error codes, and left some codes for the manufacturer to define. To access the error codes, you'll need an ODB II code reader at a minimum or an ODB II scanner. The code readers can be purchased for under $50, like the Actron PocketScan. They only read and output the codes on a 1 line screen and usually have provisions to reset the codes. You will have to look up the code numbers in a book, or on-line, just like you have to for and ODB I systems. |
||
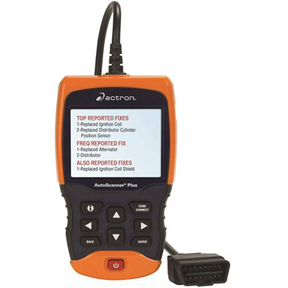 Actron CP9680
 |
There are more complex scanners available and their cost is proportional to what it can do.
Actron's top end unit was about $500 back in 2009 when I last updated this article. (Note: Prices
have come down quite a bit since I last update this article. In 2021 I purchased a new Actron
CP 9680 AutoScanner Plus with a Haynes Book "OBD-II & Electronic Engine Management Systems
(96-on)" for $140. This gives you real time readout on things like up and down stream O2
sensors and much more, some can interface with Anti-Lock Brake System - ABS, and the seat belt
systems.) While others go up to $4,000, a little to much for the hobbyist. There are some
vendors that sell interface cables and software that will run on your laptop or your smart phone
for about $50 and up. These systems, like the handheld units, will allow you monitor a many of
the parameters real time (like looking at the output of the O2 sensors, the fuel adjustments),
retrieve error codes, and reset codes.
|
|
|
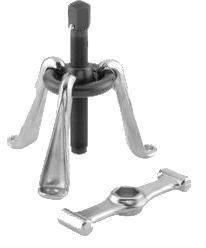
Moving on to some more specialized tools, inevitably you will need a couple of gear pullers (2 and or 3 jaw) for removing pulleys and gears from things. I'd suggest that maybe you get a 3 jaw puller set. Otherwise wait until you need the puller and buy it against the job. |
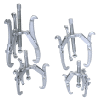 3 Jaw Puller Set |
|
 Slide Hammer Puller |
For pulling hubs, bearings, seals, axles and gears you'll want to get Slide Hammer Puller
Set. They are a must. Harbor Freight has 2 different sets of these, one is about $30 and
the other, a heavier duty one is about $90. My set is a Craftsman (it's still available for
$120). Based on my past usage of mine, I would recommend that you go with the heavy duty one.
|
|
|
The final heavy duty puller you'll need is a Hub puller. These are quite large and they
bolt to the hub for removing hubs and are used to remove the hubs from the tapered and keyed
axles, mostly on rear wheel drive cars. Again, this might be one you'll want to wait until you
actually need it, or see if you can borrow one from your auto parts store. I ended up buying
mine back in about '68, before auto parts stores started loaning these types of tools, when I
had to replace the rear axle on my '67 Spitfire.
|
 Hub Puller |
|
|
There are special pullers for AC compressor clutches, power steering pump pulleys, etc. Many of these specialized pullers can be borrowed from your local auto parts stores. There are 3 other pullers you may want to get. But I'd wait until you are going to need them and purchase them one at a time and as you go. Pullers for jobs like pulling Pitman arms, for pulling steering wheels, and steering wheel locking plate. These last three are relatively inexpensive (under $20). I suggest that you purchase these as you need them.
|
||
A Pitman Arm Puller is used to remove the pitman arm from the bottom of the steering
box. Again this is found in older car that don't have rack and pinion steering.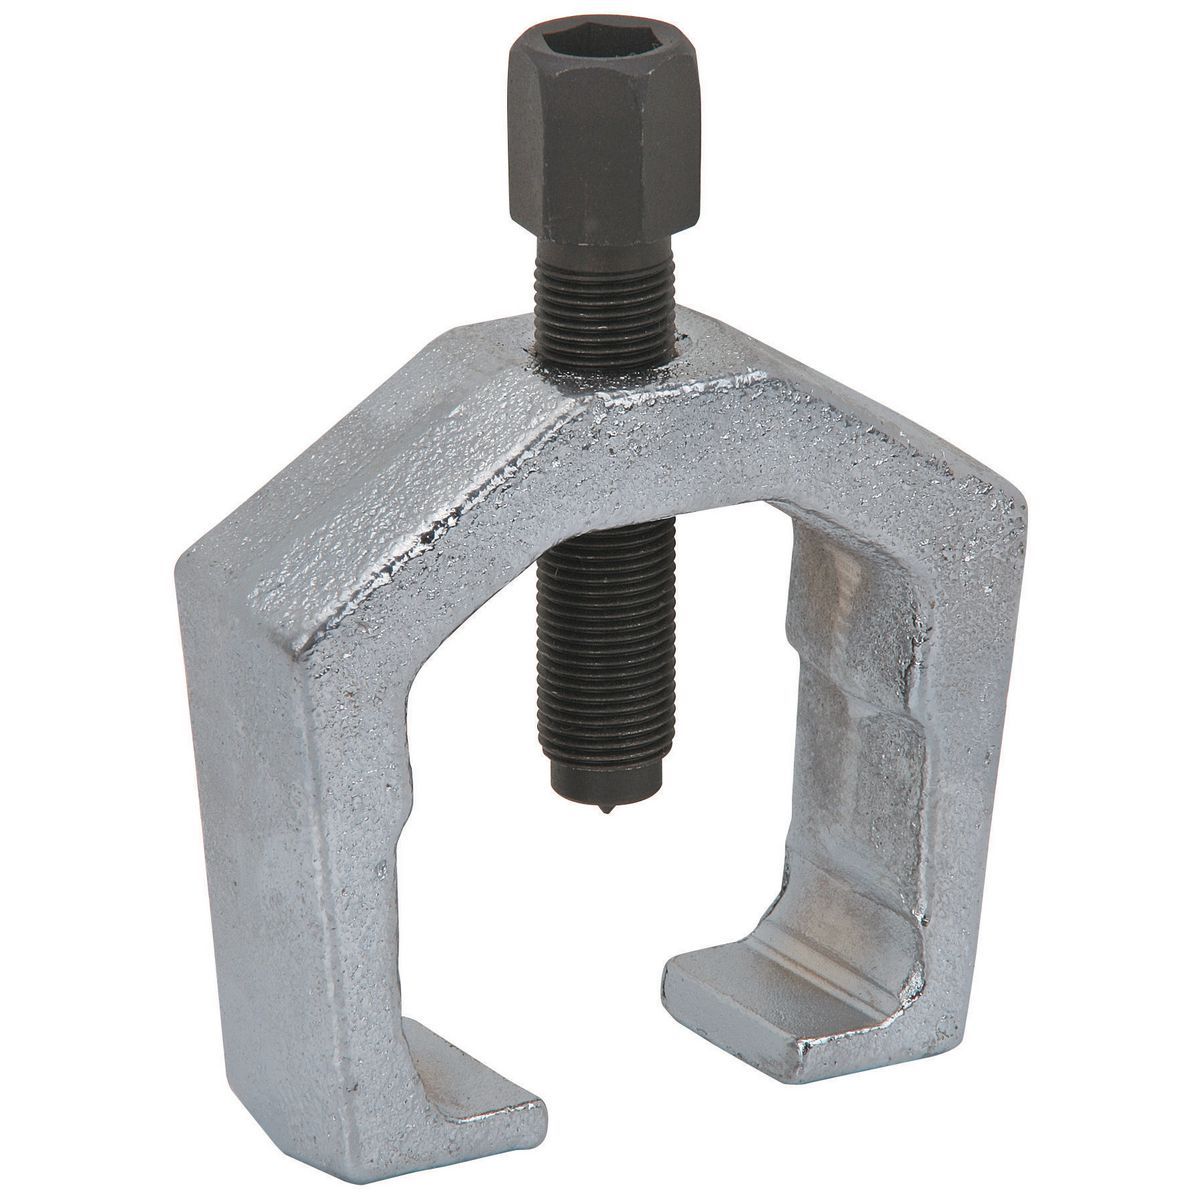 Pitman Arm Puller |
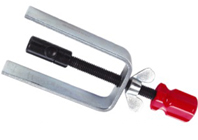
If you ever have to work on the steering column you are going to need two pullers. The first
is a steering wheel puller to pull the wheel off the steering column.
 Steering Wheel Puller |
If you are working on a later model cars (about '74 and on) with the locking steering column,
you'll need a Steering Wheel Lock Plate Puller. These are quite inexpensive around $15.
 Steering Wheel Lock Plate Puller |
|
Now that's what I call a pretty nice start to stocking a tool box. Unfortunately, we have an
expensive hobby and now we start filling our garage, not just the tool box, with tools. These
tools will also be a little more expensive.
|
||
|
An air compressor and the associated air tools, while not necessary, are a great time saver and make working on car a lot easier. One of the most important jobs in restoring a car, is fighting rust. When I restore a car, every metal part is removed, cleaned and painted. So here again an air compressor will pay for itself. I would not recommend anything smaller than a 4hp compressor with a 20 gallon accumulator. I grew up with one like this, my dad has had his Craftsman compressor for over 45+ years. But it has trouble keeping up with the sanders, sand blasters, etc. So when I went to purchase mine, I went up one size, to a Craftsman 5 hp with a 30 gallon tank (it cost about $400 in 1988). The rule of thumb is the "bigger the better", but your pocket book and available space will control your spending. |
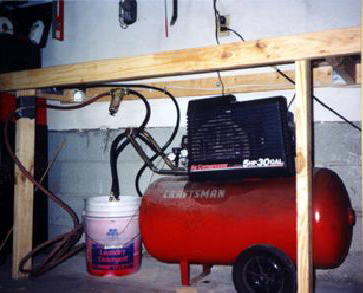 Compressor |
|
|
Compressors of less than 4hp use 115V while the 4hp and larger use 220V. If you opt for a larger one, you might have to run a new power line from your service panel. The horse power (hp) rating is the rating of the electric motor (i.e.. 5 hp., 10 hp., etc.). Some of the marketing departments of the various compressor manufactures have been playing games with the hp ratings. It seems that they are rating them based on the maximum current the motor will draw (when starting) and not the running current. So beware. 1 hp is about 750 Watts. So a 5 hp motor should consume about 5x750=3750 Watts or 3.7 Kilowatts (KW). To calculate the current required by the motor divide the Watts by the Voltage (either 115 or 220). So a 5 hp motor will draw at least 3750/115 = 32.6 amps on a 115V circuit, or 3750/220 = 17 amps on a 220V circuit. House hold wiring usually has 2 types of circuits - the 110V (also referred to as 115V or 120V) used for most electrical lighting and small appliances. The maximum a 115V circuit will be rated for is about 15 or 20 amps depending on the size wire feedint the outlet. A 20A 115V circuit requires a special outlet and plug. Heavy appliances like an electric dryer, water heater, and stove all run on a 220V circuit. So you see that a 5 hp compressor will require a 220V circuit in your shop. To help dry the air (remove moisture), you will need a dryer attached to the output of the compressor. My compressor sits by the back of the garage and I have 50' of air hose connected directly to the dryer. Originally the dryer was connected directly to the compressor and consequently could not pull much moisture out of the air. To condense the moisture out, there must be some distance between the output of the compressor and the dryer, 2 inches just didn't hack it. I got some copper tubing and wrapped it around a 2 liter Coke bottle. I connected 3 foot length of air hose to each end of the coil with one end going to the output of the compressor and the other end going to the dryer. This alone pulls a lot of water out of the air. In addition, I can submerge the coil in a bucket of water to help cool the air even more. For more on compressors and media blasting.
|
||
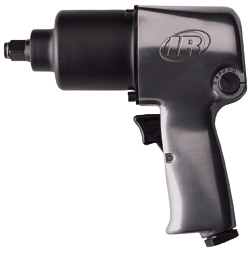 Impact Wrench |
Now that you have a compressor, you have an excuse to get some of those nice air tools you've been looking at, like a 1/2" drive impact wrench (from $40 up). This really makes changing tires easy and reduces the busted knuckles when trying to undo a really rusted bolt. (Note, I purchased a 2nd 1/2" impact wrench. It's a Champbell Hausfeld Professional PL1502 for about $65 from Northern Hydraulics. It has a lot more oomph of than the cheap $30 guns. I love it, it has replaced my cheap impact wrench as my work horse.) In 2021 I needed a better, more powerful impact wrench, and bought a EARTHQUAKE then my from Harbor Freight. This impact wrench retailed for for about $140, but on sale it was about $100. | |
| Another great air tool is a 3/8 drive ratchet (about $30 and up), and I don't know how I ever lived without it. No more hand cranking on the ratchet, just press the trigger and it does all the work! One word of caution though, Don't use it to break nuts and bolts loose. If you do, you will drastically reduce its life span. I broke the gears on my first one, trying to break a bolt loose. Use either an impact wrench or a manual ratchet to break bolts loose. | 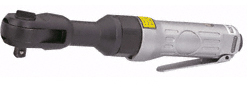 3/8" Drive Air Ratchet |
|
|
Also, DO NOT use an impact wrench or air ratchet to fully tighten nuts and bolts.
They give no feed back or feel and it is easy to break bolts off with them. If using
to run the nut or bolt down, always set the tool to its lowest power setting and stop when
the impact wrench start to make the familiar banging sound, or the air ratchet starts to pull
in you hand. Then switch to a regular ratchet or torque wrench to finish the job.
|
||
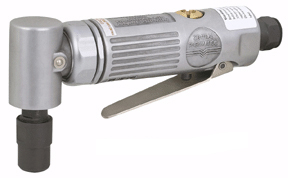 Angle Die Grinder |
A 1/4" die grinder ($20 and up) is a high speed tool and comes in straight and angled. I bought an angled grinder and an arbor and a cutting wheel. This makes short work for cutting off bolts and such. It can also be used to cut sheet metal - like a section from a fender. There is also a rubber disked arbor that you can attach a 3" sanding pad for it and some stick on 80 grit sandpaper. You can also get various cutting burrs and grinding stones.
|
|
 Dual Action Sander |
For doing body work or woodworking a dual action "DA" sander (about $40 and up) and an inline sanders (about $60 and up) are real time savers. |  Inline Sander |
You might want a paint spray gun or two. There are 3 types of spray guns, pressure
feed, siphon feed, and High Volume Low Pressure (HVLP).
|
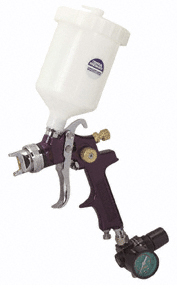 Gravity Feed HVLP Spray Gun |
|
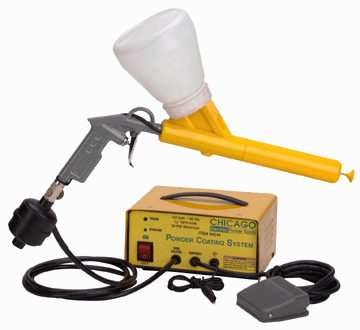 Powder Coating System |
There is also the Powder coating systems. These use and electrostatic charge to get the powder to adhear to the part. Then you bake the part in an oven to let the powder flow out onto the part. This is great for small parts, limited by the size of your over, as the powder coating hold up a lot better than traditional paint.
|
|
|
Speaking of body work, you can't do much without a set of hammers and dollies. These
are used to bang out dents and reshape metal panels. Harbor Freight has a nice set of body
hammers and dollies for under $45.
|
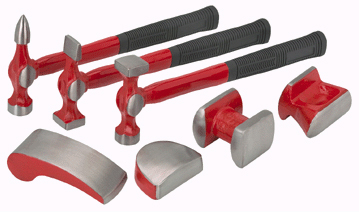 Body Working Tools |
|
 4" Angle Grinder |
For cleaning paint and rust off of metal parts I use a 4" grinder (from $40 to $100)
and replacing the grinding wheel with a knotted wire brush. (You need the "knotted" wire
brush as the grinder turns at about 10,000 rpms. Unfortunately, these brushes are pretty
expensive (about $15 each) they are the only ones rated to handle the 10,000 + rpm's of the
grinder. You need to be very carfull with these because when they grab, they will really
jump, so be sure you have a good hold on them all the time. I've had the jump or kick back
and ended up cutting my legs with the wire wheel. For stripping a relatively large area,
this high speed wire wheel does a better job than paint stripper.
|
|
|
My dad borrowed and loved it, so he bought a Makita for $55. However, we both like the one from Harbor Freight better. The 2 drawbacks to the Makita are, 1 - the arbor size is metric M10x1.25. Most discount houses sell the standard 5/8" x 11 brushes but very few handle the M10x1.25. Consequently, getting the wire wheels is harder and more expensive. The second problem is the Makita's safety guard is screwed to the case and cannot be rotated. Many times we wanted to move the guard around to allow better access when cleaning a part. When using these grinders, you should wear some sort of eye protection. I've purchased a face shield for about $12 from Northern Hydraulics. Since I wear glasses, goggles tend to fog up. You should also use some kind of hearing protector. I bought a pair of "Mickey mouse" ears from Northern Hydraulics for about $8. Finally, you should wear a pair of leather gloves. I've had the wire wheel get away from me and nick my hands. It took forever to heal, and left some nice scars.
|
||
|
In addition to the high speed grinder, the 3/8" (VSR) electric drill can be use to
clean parts by chucking up a wire wheel. The wire wheels are about $5 and an arbor
to hold the wheel is about $2.
|
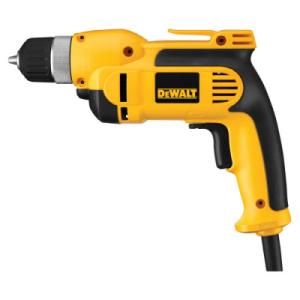 Corded Drill |
|
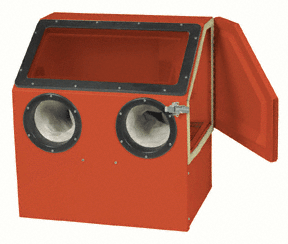 Blast Cabinet |
For small parts or places that the grinder can not get to, a sandblaster is great!
I started with a siphon blaster with a 50 pound sand tank (from $50 to $100). I moved up
to a Harbor Freight table top Blast Cabinet and to a pressure blaster. For
more information check out my article on
media blasting.
I love the Harbor Freight plastic cabinet. My only complaint with it is that the pick up tube, a short piece of pipe that sits in the tank, doesn't stay put. As you use the tank the tube floats to the top of the sand and you have to push it back down. What I did was to make some small aluminum straps to hold the tube in the hopper. The straps were pop riveted to the box.
|
|
|
If you plan on doing any major work like pulling an engine or pulling a body off a chassis,
an engine crane is a must. I purchased mine, a 2 ton hoist, for about $200. While
these can be rented, I figured I had to pull and replace the engine and the body of my
Morgan, and pull and replace the engine and body of my '75 Bricklin. At about $35 per day
rent, I could just about purchase one for the rental fee, so I did and been saving money
ever since. Since you don't need the engine crane all the time, to cut down on the space
it requires, I disassemble mine and tie all the parts against the wall of my garage
when not in use.
|
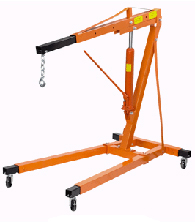 2 Ton Shop Crane |
|
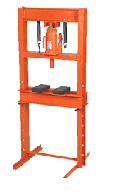 Shop Press |
A hydraulic press is a useful item although expensive. While you can send
the work out to be done, unless you know someone, it can get expensive. Depending
on the type of work you are doing, this will be one of the least used tools in your
shop. You use them to press on or off Universal Joints, bushings, and bearings. I
had to pay $30 to have the old bearings pressed off and a new bearing pressed into
the steering knuckle of my Voyager van. Since I've got 2 Voyagers and had to do the
job to both, that's 4 times. Almost the cost of a press. However, it's nice to be
able to press bearings on and off when you need to. The down side is that you're
starting to fill an a lot of garage floor space with these big tools. So maybe for
the few times you need it, it's better to pay to have the press job done. Harbor
Freight as several nice presses for about $120 - $220.
|
|
| Another item is a welder. There are 4 basic types of welders: oxy-acetylene, arc, and MIG or wire feed and TIG. MIG stands for welding for dummies! Not really it stands for Metal Inert Gas. I would suggest a MIG welder for an initial investment. But is the easiest to learn to use. Most welding on a car is replacing thin sheet metal panels. This is what the MIG does best. The MIG welder doesn't generate the heat the other 2 welders do. The wire feed feature makes welding easier for the hobbyist use. I'm purchased a Lincoln SP100 MIG welder for about $600. To add the gas regulator, bottle, hood and gloves cost about $200 more. The MIG and the wire-feed welders are the same unit. The difference is for MIG you add the gas regulator and bottle of gas. I really can't say much about TIG as I've never done any TIG welding. | 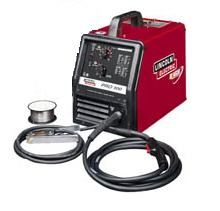 MIG Welder |
|
|
There is a different sleeve that goes inside the cable that feeds the wire also to handle
the different size diameter of the welding wire. The MIG wire I use is .023" while the
gas less wire is has flux in it core and is about .035". If you decide to purchase a MIG
welder, look for one that has continuously variable wire feed speed and voltage settings
vise the 4 to 6 click stop settings. This way, you can adjust the machine to fit you and
you don't have to learn vary your welding to meet the machine.
I must admit that my dad already has the oxy-acetylene (with the 5 foot tall tanks) and an arc welder so I have access to them and haven't had to buy either of these. |
||
 Oxy-Acetylene Welder |
Taking a quick look at oxy-acetylene welders. What are they good for? A very good welder can weld about anything with one of these units, but it takes a long time to become that good. Due to the heat generated, it is very ease to warp a thin sheet metal panel on a car. The two things that are nice about oxy-acetylene welders, is the heat and cutting. If you need to bend or shape a piece of metal, you can get it cherry hot and then bend or shape it a lot easier than doing it cold. Another nice thing about the heat, is if you have a nut or bolt that doesn't want to move, in many cases you can use the "hot wrench" technique. Get the nut or the metal surrounding the bolt hot. This heat will help loosen the nut or bolt. Finally, there is the cutting torch aspect. While the cuts aren't the smoothest it does cut metal nicely and quickly. | |
|
I find that many times I need to cut up something, like a car that my friends
and I are stripping. To move my dad's 5 foot tanks from his place to mine is a
real chore, and to move some of the things I'm working on to his place is even
harder. Consequently, I'd prefer a slightly smaller set of bottles. Something
in the neighborhood of 40 to 60 cubic feet. This setup has the advantage of
portability. The only drawback is that the bottles of gas don't last as long.
It's a real pain to run out of gas on a Friday night and not be able to use the
equipment until Monday night after the welding suppliers open Monday.
One final note on oxy-acetylene, if you get a setup, be sure to get flame arrestors.
These connect to the hoses, and are designed to keep the flame from walking back
into the lines and causing the tanks to explode.
Welding can be very useful, but like a lot of tools (especially electric saws) it can be very dangerous. Look around where you are going to weld. You don't want anything that is flammable near by. If you are a home hobbyist, try to do all you welding and cutting outside. You don't want the sparks to catch something on fire in your garage. Also be careful when welding on a car. Again, look at what you plan on welding, both sided. Don't try to weld on the bottom of the floor pans, and still have the seats, carpet, or insulation material in place. They will catch on fire. If you decide to purchase any type of welder, check with your local Vocational Technical Schools, or Community Colleges. Many offer welding courses. These are definately worth the cost. You will go through a lot of gas, electricity, and metal learning to weld. All this is covered in the cost of the class. Plus you have an instructor to help you with the technique. In closing, the tools just mentioned represent quite a sizable investment and will start to set up a very nice work shop. You may not need or want all the tools I've described here. But you now have an idea of some of the tools that are available and what they are used for. You don't have to go out and purchase all the tools at once. Keep a list of desired tools prominently displayed or just hand it the your wife, girl friend and kids (or all three). There is always a tool for every gift giving occasion. If you aren't already familiar with the companies I've mentioned, here are the names of several mail order tool houses. If you don't have their catalogues, simply give them a call and they'll send you one. They make great reading. You can spend hours just drooling over all the tools you don't have and dream of how much easier life would be if you only had that tool. If you really get into body work, you'll probably have to do some metal cutting. There is a whole nother world of tools for cutting metal.
Harbor Freight Tools Kitts Industrial Tools For a list of tools to buy and possible the order to purchase them. Return to the Index of Tech. articles To email me with comments or questions.
|
||